The Root Canal Journey: A Step-by-Step Guide from Diagnosis to Recovery
Root canals often spark feelings of anxiety, with many people picturing intense pain or lengthy procedures. Myths and misunderstandings have made root canals one of the most feared dental treatments, despite being a safe and effective way to relieve pain and save a tooth. This guide will take you through each step of the root canal journey—from the initial diagnosis and preparation to recovery and long-term care.
By breaking down the process, this post aims to replace any fears with knowledge and reassurance. Expect a clear, practical understanding of what happens during each stage, leaving you informed and ready for a smooth recovery experience.
Understanding the Need for a Root Canal
What is a Root Canal?
A root canal is a procedure to remove infected or damaged tissue from the inside of a tooth. This tissue, known as the pulp, can become infected from deep decay, trauma, or cracks. The goal of a root canal is to clean out the infection, fill the empty canals, and protect the tooth with restoration.
Common Reasons for Root Canals
Several issues can lead to the need for a root canal. Deep cavities that reach the pulp are a primary reason. Additionally, cracked or chipped teeth expose the pulp to bacteria, which can cause infection. Other reasons include repeated dental procedures on a tooth, which weaken it, or trauma that injures the pulp.
Symptoms Indicating a Root Canal May Be Needed
Certain symptoms may signal a need for a root canal. Persistent tooth pain, especially when chewing, often indicates pulp infection. Prolonged sensitivity to hot or cold, along with swelling and tenderness in the gums near the tooth, are also common signs. If you experience these symptoms, consult your dentist promptly to assess whether a root canal is the best option.
The Diagnosis Process
Dental Examination
During a dental exam, your dentist will carefully inspect your tooth and ask about your symptoms. They may test your tooth’s sensitivity to temperature or pressure to understand the extent of the damage.
X-rays and Imaging
X-rays play a crucial role in diagnosing a root canal issue. They help the dentist see inside the tooth and assess how far the infection has spread. With X-rays, the dentist can view the root canals and confirm if infection or damage exists.
Diagnosis Confirmation
Once the dentist examines the X-rays, they’ll confirm if a root canal is necessary. Sometimes, alternative treatments are possible if the damage is minor or infection-free.
However, if the pulp is infected, the dentist will recommend a root canal as the best option to save the tooth. They will explain each step of the procedure, allowing you to prepare mentally and understand why this treatment is essential for preserving your tooth.
Preparing for the Root Canal
Discussing the Procedure
Your dentist will discuss the entire root canal process before the procedure begins. They will explain the steps involved and outline the expected timeline. This conversation helps ease your mind and ensures you know exactly what will happen.
Anesthesia Options
Dentists use local anesthesia to numb the area around the tooth. This ensures you will feel no pain during the procedure. Some dentists offer sedation options for patients with severe dental anxiety. Discussing these options with your dentist can help you choose the right one for your comfort.
Pre-Procedure Tips
Before your root canal, eat a light, balanced meal. Avoid alcohol and tobacco, as they can interfere with healing. Inform your dentist of any medications or health conditions to ensure safe and effective treatment. Prepare for a relaxing day post-procedure, giving your body time to recover.
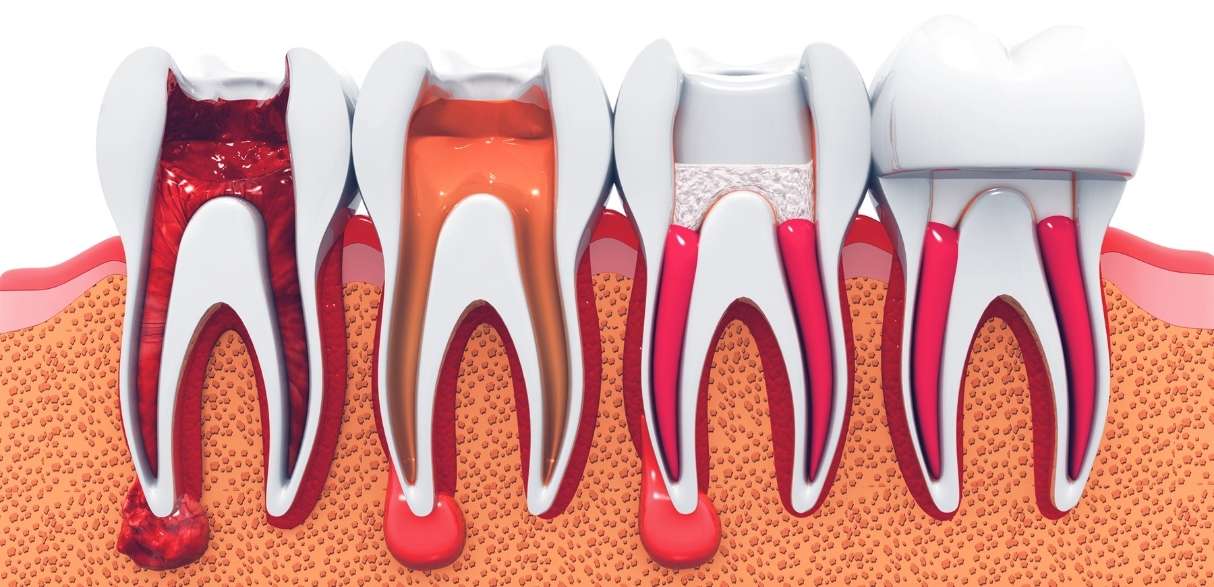
The Step-by-Step Procedure of a Root Canal
Numbing the Area
Your dentist will start by numbing the tooth and surrounding area, ensuring you feel comfortable throughout the procedure.
Accessing the Pulp
Once the area is numb, the dentist creates a small opening in the top of the tooth to reach the pulp. This access point allows them to clean the infected tissue and shape the canals.
Cleaning and Disinfecting the Canals
Next, the dentist removes the infected pulp from the root canals using specialized tools. They thoroughly clean and disinfect the area to eliminate bacteria and prevent future infection.
Filling the Canals
After cleaning, the dentist fills the empty canals with a rubbery material called gutta-percha. This seals the canals and blocks bacteria from re-entering.
Final Restoration
A temporary filling seals the tooth until a permanent crown or filling is placed. This last step restores the tooth’s structure, allowing it to function normally again.
Immediate Post-Procedure Care
What to Expect Right After the Procedure?
After a root canal, numbness in the treated area is common and will wear off within hours. Some discomfort or mild pain is normal as your mouth begins to heal.
Pain Management
Over-the-counter pain relievers like ibuprofen can help manage any post-procedure soreness. Applying a cold compress to the outside of your cheek can also reduce swelling and relieve discomfort.
Diet Tips
Stick to soft foods, especially on the day of the procedure. Smoothies, soups, and yogurt are gentle on the treated area. Avoid chewing on the treated tooth until the dentist places the permanent crown or filling.
The Recovery Phase
Typical Recovery Timeline
Most people recover from a root canal within a few days. Mild soreness may last for a day or two but usually subsides quickly. By following your dentist’s instructions, you can speed up the healing process.
Signs of Complications
While rare, complications can arise. Watch for signs like persistent pain, swelling, or fever, as these may indicate infection. Contact your dentist promptly if you experience any of these symptoms.
Follow-Up Appointments
A follow-up appointment is usually necessary to monitor healing and to place a permanent crown on the treated tooth. The crown protects the tooth, helping it last as long as possible. Regular check-ups help ensure a successful recovery and long-lasting results.
Long-Term Care After a Root Canal
Proper Oral Hygiene Tips
Maintain a healthy smile by brushing twice daily, flossing, and using an antiseptic mouthwash. Good oral hygiene prevents future issues and keeps your root canal-treated tooth healthy.
Regular Dental Check-Ups
Routine dental visits are essential to monitor the condition of your root canal and overall oral health. Dental exams help catch potential issues before they worsen.
Lifestyle Adjustments
Avoid hard foods that could damage the crown, like ice or nuts. If you grind your teeth at night, consider wearing a mouthguard to protect your dental work. These adjustments help prolong the life of your treated tooth.
Root canals are a safe, effective way to relieve pain and save your tooth. By understanding each stage, from diagnosis to aftercare, you can approach the procedure with confidence.
If you suspect you may need a root canal, do not delay—reach out to our dentists for an evaluation. With the right care, recovery is manageable, and the benefits can last a lifetime. Schedule your appointment today to protect and preserve your smile!